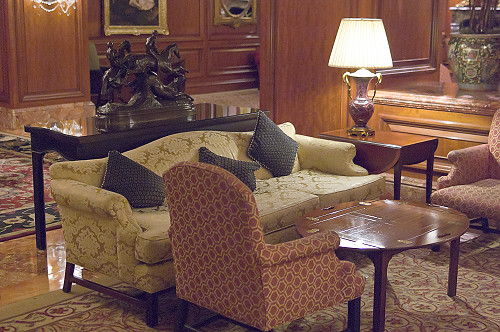
PLEASE CONSIDER THIS photo of my living room:

(Or rather, this is a photo of the lounge at the Ritz-Carlton in Clayton, Missouri.)
Like very many interior photos — taken without a flash — this has a yellowish color cast. Undoubtably this yellow cast is due to the color of the lighting. Obviously incandescent light has a slightly yellower color of light than daylight. So there is no surprise that incandescent photos appear yellow.
Perhaps you think that the white balance feature on your digital camera is simply a minor adjustment. Perhaps it corrects for the slightly yellower color of incandescent lighting. Certainly I thought so.
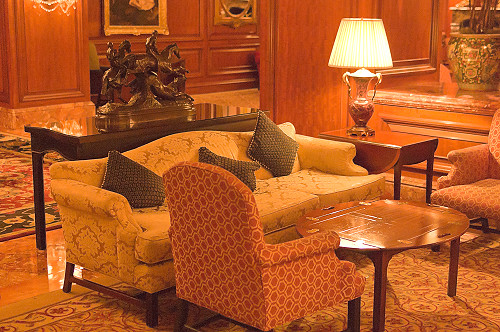
Here is a white-balanced version of the photo above. I adjusted the photo so that a white object under this lighting was measurably neutral: that is, the red, green, and blue color values of the white object were equal after adjustment.
It looks a bit better: the yellow color cast has been removed. A small difference, but I think it improves the photo a bit, for it brings out the variety of colors better, and it is closer to what I remember seeing. I recommend always using a neutral white balance unless you have a specific reason not to do so.
Now consider this photo:
This is very yellow. But this so happens to be the scene assuming a daylight white balance. Were I to take a photo of a white object under bright daylight with this balance, it would look white. Incandescent lighting is actually far more yellow/orange in color than is daylight.
You may not be aware that your eye does an automatic white balance: when you look at a scene, your eyes attempt to subtract out the color of the lighting, and your eyes do a pretty good job of this, up to a point. Cameras work the same way; they also attempt to automatically subtract out the color of the light.
Keep in mind that perceptibly slight changes in the color of light may translate to a radically different objectively measurable difference in color.
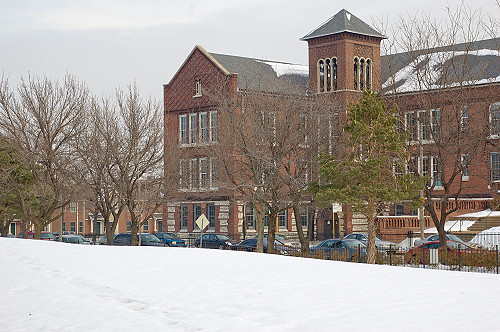
Here is a photo taken outdoors, with a Daylight white balance:
And the same photo, with the color balance set to incandescent lighting; it is the same white balance I used in the nicely-corrected interior photo #2 above:
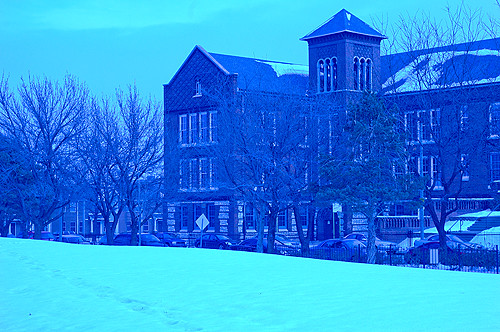
We see that the camera's white balance corrects for extreme differences in the color of light, not merely minor differences. How the eye corrects for white balance is a mystery, and the technology behind a camera's automatic white balance feature is ultimately imperfect, which is why I do a manual white balance whenever I'm doing my best work.
White Balance and Noise
Digital cameras have an intrinsic, fixed white balance. The color data captured by the camera sensor is adjusted by the camera's computer according to the white balance setting. Here are our sample pictures again, showing what they look like when using my camera's native white balance:

The images are greenish because each green sensor is more sensitive under most lighting conditions than the others. For more details, see the article What Does the Camera Really See? For an overview of the color system used by digital cameras, read Color Spaces, Part 1: RGB. Digital cameras generally are rather insensitive to blue light.
To correct for the green snow scene above, the camera must amplify both the red and blue color channels to match the green, and whenever you amplify a signal, you also amplify noise.
For the interior scene, the camera must amplify the red channel a little (since incandescent lighting has plenty of red light), while it has to amplify the blue channel a lot, creating plenty of noise.
Here is an extreme example of this sort of noise amplification:
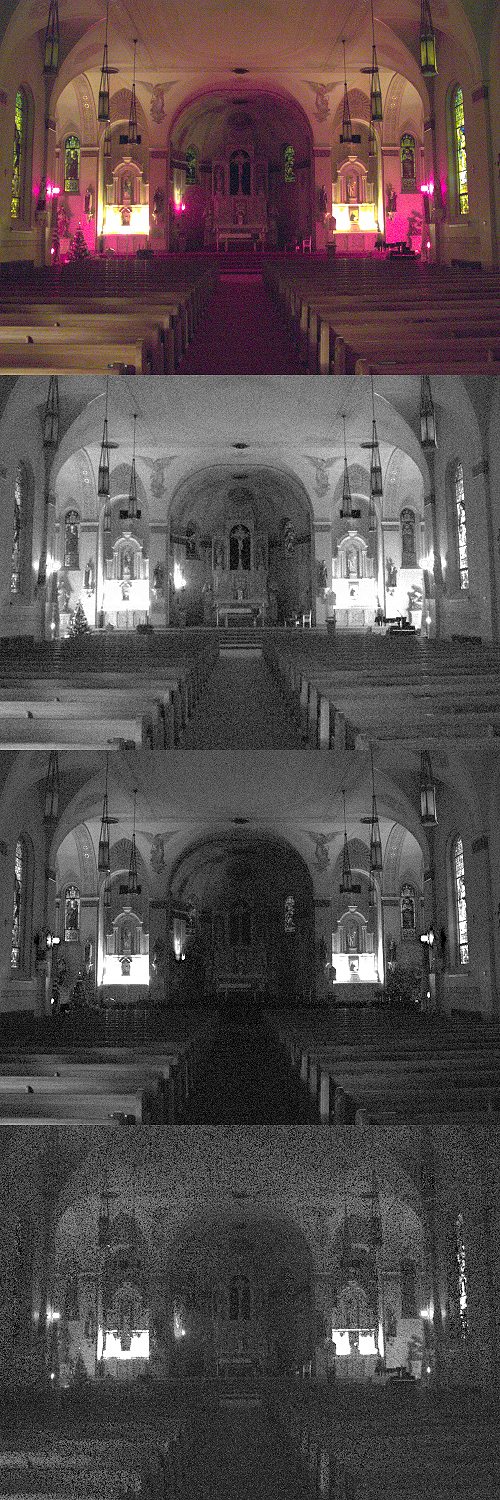
I took this a number of years ago with an inexpensive point-and-shoot camera. While the red and green channels have a lot of noise, due to the camera being set to ISO 1600, the blue channel at the bottom is particularly bad. The blue channel, due to incandescent white balance, was greatly amplified relative to the other channels, and so it shows plenty of noise.
Generally speaking, if you want low-noise interior photos, you are asking a lot of your camera, and you will likely spend a premium to get this. Read this for details: One Easy Rule for Quality Images.
White Balance and Exposure
If you don't set your white balance correctly, you risk bad exposure if you shoot JPEG. Please note that I define good exposure by taking all three color channels into consideration; see the article Three Opportunities for Overexposure for details. If even one of your three channels is significantly overexposed, you will get shifts in highlight color. In an extreme case, here is the daylight photo set with an incandescent white balance:
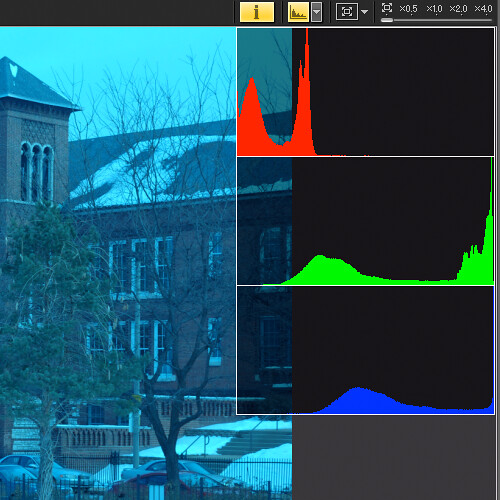
This is a selection from Nikon's View NX2 software, showing the three color histograms at this white balance. Each graph has the dark pixels to the left, and the bright pixels on the right: we see here that the red channel is underexposed, white the blue channel is overexposed. Due to poor white balance, we irrevocably lost both highlight and shadow detail.
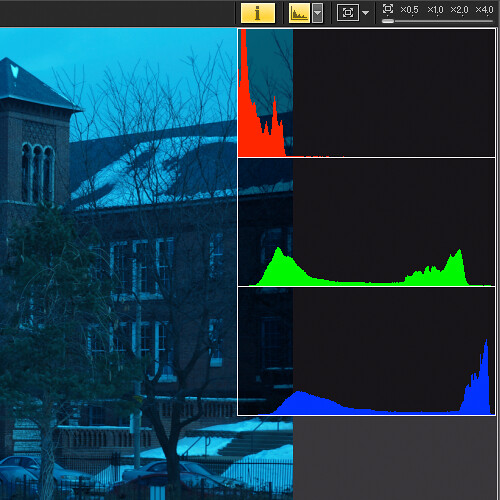
The histograms seen here are similar to the three color histograms found on many digital cameras. Like many photographers, I usually check the color histograms to make sure that my photos are exposed properly. In order to use as much of the camera's dynamic range as possible, I try to expose the images as much as I can without overexposing any one of the three histograms. However, were I to use this process with a poor white balance, I would inevitably get a severely underexposed image. In the image above, reducing the exposure to preserve the blue channel highlights would lead to a severely underexposed red channel:
Now you might just want to have this ‘look’ in your photo, and that's fine. But if you instead plan on ‘fixing in Photoshop’, forget it.
Please note that you will see the same problem if you shoot incandescent lighting with bluer white balances — Daylight, Cloudy, and Shade — except your red channel will likely be greatly overexposed while your blue channel will be underexposed.
As a general rule, you will get the best exposure if you use a neutral white balance. You can expose the image longer with less noise and less chance of clipping highlights if you set your white balance precisely.
But please remember that cameras have fixed intrinsic white balance, as seen above. You get a greater risk of overexposing or underexposing color channels when you shoot JPEG images, because the camera throws away lots of its original sensor data when performing a white balance — and you risk throwing away good useful data if you set your white balance wrong. For this reason, I shoot RAW images (which retain all of the original sensor data), because I can adjust the white balance on my computer after the fact. The risk of bad exposure is lessened — although not eliminated — when you shoot RAW and so you still ought to be careful at the time of shooting.
The trade-off is that RAW files need to be processed on your computer to produce an image usable for either printing or displaying on the web. I find the trade-off acceptable, although I know that many photographers do not.
Some authorities state that since a camera has a fixed intrinsic white balance, then the camera exposure histograms ought to show the RAW color channels. I think this is an excellent idea. Some photographers attempt to do this by forcing the camera to use a white balance that does no color adjustment at all: their histograms in this case are correct. The UniWB method of using the camera's own intrinsic white balance was developed by Iliah Borg and others, and the method is described here. It is not for the faint-hearted, since all your photos will turn out green, and you will have to correct for white balance on your computer. You can however get better exposure. At the very least, this is a good learning tool, if not really practical.
Note to camera manufacturers: please show the RAW histograms when shooting RAW! Also, give the ability to zoom in to the brightest pixels on the histograms, for overexposure in digital photography is worse than underexposure. When you show blinking pixels, be sure that they blink when even one of the channels is overexposed.
When to White Balance and When Not to White Balance
As I mentioned before, I recommend always setting your white balance precisely unless you have a specific need to do otherwise.
Have a look at A Digital Color Wheel. Colors opposite from each other are called opponent colors: a color balance biased towards one edge of the wheel will aways be at the expense of the opposite edge. If your image is too blue you will not get enough yellow, and too much green will mean too little magenta. If the white balance is in the center you will trade off quantity of color for quality of color; a well-white-balanced image will look richer in color content, and you have less risk of having your colors go out of gamut. You can get better results in saturating the colors if your white balance is precisely in the middle.
Sometimes you may want to capture a scene as you remember seeing it; but don't forget that your eye already does strong white balancing. So if you want to capture the warm glow of candlelight, set your white balance to somewhat warmer than neutral. To capture the cold mood of a snowy day, set your white balance to a somewhat cooler balance than neutral. Although your eye does do white balancing, this mechanism doesn't work well under dim lighting, although I am uncertain as to what the actual relationship might be. This is worth further research.
Here is a photo where I did not want the camera to subtract out the color of the light:
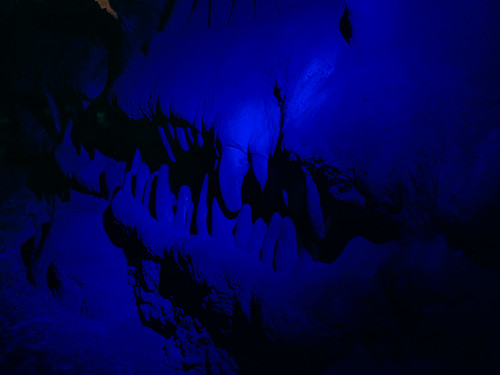
A fantastical beast, at the City Museum in Saint Louis. Click the image twice to view it on black.
Sometimes you may want an image with a strong overall color tone, but you may get better results if you first convert the image to black and white, and then add a tone afterwards, not relying on white balance.
Mixed Lighting
Your eyes not only do an automatic white balance, but they adjust this white balance variably across the scene while you are looking at it. When you take a photo of a scene, and reduce that panorama down to a tiny, low-contrast image displayed on a page or on a screen, this automatic white balance hardly operates, which is why you have to get it right in the camera. A severe problem occurs when you have mixed lighting of multiple colors, for example, when you shoot an interior, illuminated with incandescent lighting, while also having windows to the outside appearing within your photos. Invariably your windows will look fine with the interior too yellow, or the interior looks fine while the scene outdoors is very blue. The photograph just doesn't look as you see it in real life.
With architectural interiors, I will use daylight white balance for the windows and incandescent white balance for the interior, and then composite these versions of the image. The results are good, even though this is a tedious process. Big-budget cinematographers will put large yellow-colored gels over the outside of the windows so that the color of the transmitted daylight matches the lighting used in the interior.
Far more problematic is when fluorescent lighting is used in an interior. Not only do these lights have an odd color — typically they are simultaneously more yellow and more green than daylight — but fluorescent colors are not constant across brands of lamps. They do not provide a continuous full spectrum of light, and even more problematic, they change color as they quickly flicker 50 or 60 times per second. Almost invariably, if you attempt to white balance fluorescent lighting, you will get strong shades of the opponent colors green and magenta throughout your image. These green/magenta color casts will be considerably increased if you also have daylight or incandescent lights in the scene. If at all possible, I will turn the fluorescent lights off.
Also see the article: White Balance, Part 2: The Gray World Assumption and the Retinex Theory.
No comments:
Post a Comment